SMALL

mv

mv는 이름변경 이동을 담당하는 명령어이다.


형식) mv 원본파일 대상파일


예를들어 test.txt 라는 파일이 있다고 치고 나는 /home 디렉토리로 옮기고싶다.

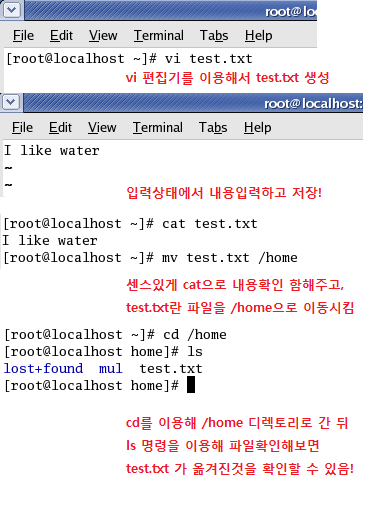
하면 mv test.txt /home 이런식으로 적으면 test.txt 파일이 /home 디렉토리로 이동하게 된다.

( 물론 원래 현재 디렉토리에 있던 test.txt은 없어지게 된다. ) 


만약에 mv test.txt test1.txt 라고 하면,

test1.txt 라는 파일은 원래 없기때문에 자연스럽게 test.txt란 파일은 사라지고 test1.txt로 남게된다.

즉, 이름 변경이 가능하다는 뜻이다.


cp


cp는 파일이나 디렉토리를 다른 파일 또는 다른 디렉토리로 복사(Copy)를 수행한다.


형식) cp 원본파일 대상파일


예를들어 test.txt 라는 파일이 있다고 치고 /home 디렉토리에 복사해서 내용이 같은 파일을

복사하고 싶다면 cp test.txt /home 이런식으로 적으면 test.txt 파일은 그대로 있되

/home 디렉토리에도 또다른 test.txt 파일이 내용똑같은 상태에서 저장하게 된다.


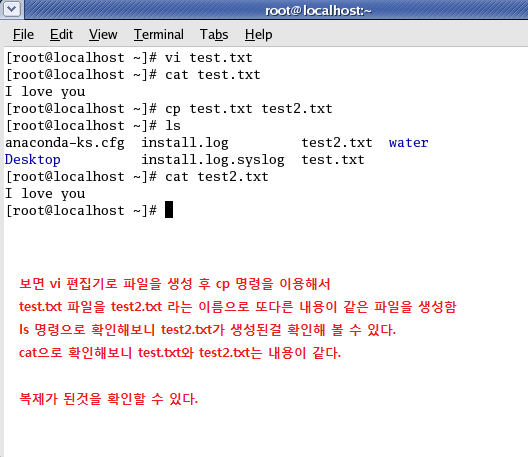
또는 cp test.txt test2.txt 이런식으로 하면 test.txt 내용이 똑같이 복사된 test2.txt를

생성하게 된다.


옵션)

-a : 원본 파일의 속성, 링크 파일 정보를 유지하며 복사

-b : 파일이 존재할 경우 기존 파일을 백업

-d : 복사할 원본이 심볼릭 링크일 때 심볼릭 링크 자체를 복사

-f : 복사할 대상이 있으면 강제로 지우고 복사

-i : 복사할 대상이 있으면 강제로 지우고 복사

-r : 디렉토리 복사할 때 사용

-v : 복사 과정 자세히 출력

-u : 복사할 대상의 변경 날짜가 같거나 더 최근 것이면 복사하지 않음


옵션 예 ) cp -r 디렉토리명1 디렉토리명2


자, 그럼 실습을 통해 이해하기 쉽게 알아보자.


mv 명령 실습


cp 명령 실습


내용 저장시 당연히 콜론상태에서 wq 해줘야하는거 잊지않기


옵션을 이용해서 응용해 스스로 실습하는 시간을 가져보길 바란다.

LIST

'Linux' 카테고리의 다른 글

리눅스 명령어 모음  (0) 2015.06.24
리눅스 파일 찾기 (파일명 검색)  (0) 2015.06.24
ubuntu apt 패키지 삭제  (0) 2015.03.17
linux hdd mount 하기  (0) 2015.03.16
ubuntu Postgresql password변경  (0) 2015.03.10
블로그 이미지

SeoHW

,
SMALL

Cannot load JDBC driver class 'com.postgresql.jdbc.Driver' [duplicate]

에러시. 아래와같은 해당되는 버전 코드 추가 Pom.xml 파일.

Add the dependency on the postgresql driver to your pom.xml file

<dependency>
    <groupId>org.postgresql</groupId>
    <artifactId>postgresql</artifactId>
    <version>9.3-1101-jdbc41</version>
</dependency>


LIST

'PostgreSql' 카테고리의 다른 글

postgrersql 설치시 세팅값  (0) 2015.06.24
블로그 이미지

SeoHW

,

ubuntu apt 패키지 삭제

Linux 2015. 3. 17. 14:50
SMALL

우분투(Ubuntu)에서 패키지를 관리하는 명령어가 몇가지 있습니다. 그 중 가장 기본이 되는 것이 apt-get입니다. 많은 옵션이 있는데, 자주 쓰는 몇가지를 정리해보겠습니다.

apt-get update

패키지 목록을 갱신합니다.

apt-get upgrade

모든 패키지를 최신 버전으로 업그레이드합니다.

apt-get install abc

abc 패키지를 설치합니다.

apt-get remove abc

abc 패키지를 삭제합니다. 설정파일은 삭제하지 않습니다.

apt-get purge abc

abc 패키지를 삭제합니다. remove와 다르게 설정파일도 삭제합니다.

참고로 패키지 검색은 apt-cache로 합니다. abc라는 단어를 포함한 패키지를 검색하려면 

apt-cache search abc

와 같이 하면 됩니다.

apt-get 명령어의 사용법과 옵션은

apt-get -h

으로 알아낼 수 있습니다. 결과는 다음과 같습니다.

apt 0.8.16~exp12ubuntu10.12 for i386 compiled on Jul 16 2013 18:00:58
Usage: apt-get [options] command
       apt-get [options] install|remove pkg1 [pkg2 ...]
       apt-get [options] source pkg1 [pkg2 ...]

apt-get is a simple command line interface for downloading and
installing packages. The most frequently used commands are update
and install.

Commands:
   update - Retrieve new lists of packages
   upgrade - Perform an upgrade
   install - Install new packages (pkg is libc6 not libc6.deb)
   remove - Remove packages
   autoremove - Remove automatically all unused packages
   purge - Remove packages and config files
   source - Download source archives
   build-dep - Configure build-dependencies for source packages
   dist-upgrade - Distribution upgrade, see apt-get(8)
   dselect-upgrade - Follow dselect selections
   clean - Erase downloaded archive files
   autoclean - Erase old downloaded archive files
   check - Verify that there are no broken dependencies
   changelog - Download and display the changelog for the given package
   download - Download the binary package into the current directory

Options:
  -h  This help text.
  -q  Loggable output - no progress indicator
  -qq No output except for errors
  -d  Download only - do NOT install or unpack archives
  -s  No-act. Perform ordering simulation
  -y  Assume Yes to all queries and do not prompt
  -f  Attempt to correct a system with broken dependencies in place
  -m  Attempt to continue if archives are unlocatable
  -u  Show a list of upgraded packages as well
  -b  Build the source package after fetching it
  -V  Show verbose version numbers
  -c=? Read this configuration file
  -o=? Set an arbitrary configuration option, eg -o dir::cache=/tmp
See the apt-get(8), sources.list(5) and apt.conf(5) manual
pages for more information and options.
                       This APT has Super Cow Powers.
LIST

'Linux' 카테고리의 다른 글

리눅스 파일 찾기 (파일명 검색)  (0) 2015.06.24
linux 파일만들기, 파일옮기기,이동,복사하기  (0) 2015.03.19
linux hdd mount 하기  (0) 2015.03.16
ubuntu Postgresql password변경  (0) 2015.03.10
ubuntu JDK install  (0) 2015.03.05
블로그 이미지

SeoHW

,

linux hdd mount 하기

Linux 2015. 3. 16. 13:42
SMALL

linux hdd mount 하기


디스크가 인식되었는지 확인합니다.
$ sudo fdisk -l


파티션 할당합니다.
$ sudo fdisk /dev/sdb1

m 눌러서 명령을 봅니다.

n 눌러서 파티션을 추가합니다.

p 파티션 생성

파티선 생성이 끝나면


w 눌러서 저장합니다.

리부팅 합니다.

파티션을 포맷합니다.  (파티션을 하나로 잡았을경우)
$ sudo mkfs.ext3 /dev/sdb1

마운트할 디렉토리를 만듭니다.
$ sudo mkdir /pub

마운트 합니다.
$ sudo mount /dev/sdb1 /pub


자동 마운트 설정을 추가합니다.
$ sudo vi /etc/fstab

다음 부분 추가합니다.
/dev/sdb1 /pub ext3 defaults,errors=remount-rw 0 1


* 요즘은 UUID로 입력한는 경우가 많습니다


UUID 확인

$ ls -l /dev/disk/by-uuid


자동 마운트 설정을 추가합니다.
$ sudo vi /etc/fstab

다음 부분 추가합니다.
UUID='UUID' /마운트할/폴더명 ext3 defaults 0 1

LIST
블로그 이미지

SeoHW

,
SMALL

ubuntu Postgresql password변경


sudo -u postgres psql postgres

# \password postgres

Enter new password: 사용할 비밀번호


LIST

'Linux' 카테고리의 다른 글

ubuntu apt 패키지 삭제  (0) 2015.03.17
linux hdd mount 하기  (0) 2015.03.16
ubuntu JDK install  (0) 2015.03.05
Tomcat의 logging.properties 및 디렉토리설정  (0) 2015.02.12
Ubuntu Tomcat install  (0) 2015.02.12
블로그 이미지

SeoHW

,

ubuntu JDK install

Linux 2015. 3. 5. 16:42
SMALL

1. apt-get 으로 openjdk 설치


기본적으로 Ubuntu에서 지원하는 apt를 가지고 설치를 할 수 있습니다.

apt 로 설치할 수 있는 항목은 openjdk입니다.


Ubuntu Desktop 버전에서는 우분투 소프트웨어 센터에서 UI 화면을 보면서 설치할 수 있습니다.


터미널에서는 아래와 같이 명령을 주면 됩니다.


$ sudo apt-get install openjdk-7-jdk


openjdk 도 jdk 역할을 하지만, oracle에서 제공하는 jdk를 사용하는 분들은 아래와 같이 진행하면 됩니다.


2. apt-get 으로 oracle-java7 jdk 설치하기


apt-get 으로 oracle에서 제공하는 jdk를 설치하려면 아래와 같이 하면 됩니다.


$ sudo add-apt-repository ppa:webupd8team/java
$ sudo apt-get update
$ sudo apt-get install oracle-java7-installer


.

LIST

'Linux' 카테고리의 다른 글

linux hdd mount 하기  (0) 2015.03.16
ubuntu Postgresql password변경  (0) 2015.03.10
Tomcat의 logging.properties 및 디렉토리설정  (0) 2015.02.12
Ubuntu Tomcat install  (0) 2015.02.12
Linux 방화벽 포트열기  (0) 2015.02.12
블로그 이미지

SeoHW

,
SMALL
Jetty 설치 및 구성


1. http://www.eclipse.org/jetty/downloads.php 페이지에서 설치 파일을 다운로드 한다.
본 예에서는 zip 패키지 파일을 다운로드하여 설치한다.

2. 다운로드 받은 파일을 임의의 설치 디렉토리에 압축을 해제한다.
----------------------------------------------------------------------------------
C:\jetty-distribution-9.2.2.v20140723

2014-08-11  오후 01:02    <DIR>          .
2014-08-11  오후 01:02    <DIR>          ..
2014-08-11  오후 01:02    <DIR>          bin
2014-08-11  오후 01:02    <DIR>          demo-base
2014-08-11  오후 01:02    <DIR>          etc
2014-08-11  오후 01:02    <DIR>          lib
2014-07-23  오전 11:47            30,012 license-eplv10-aslv20.html
2014-07-23  오전 11:47    <DIR>          logs
2014-08-11  오후 01:02    <DIR>          modules
2014-07-23  오전 11:47             6,262 notice.html
2014-07-23  오전 11:47             1,188 README.TXT
2014-07-23  오전 11:47    <DIR>          resources
2014-08-11  오후 01:02    <DIR>          start.d
2014-07-23  오전 11:47             2,397 start.ini
2014-07-23  오전 11:47           105,491 start.jar
2014-07-23  오전 11:47           368,015 VERSION.txt
2014-08-11  오후 01:02    <DIR>          webapps
----------------------------------------------------------------------------------


3. JETTY_HOME 경로에 있는 start.jar 파일을 실행하면 jetty가 구동된다.
명령프롬프트에서 java -jar start.jar 를 입력후 Enter
jetty는 기본적으로 8080포트를 사용한다. 

----------------------------------------------------------------------------------
> cd C:\jetty-distribution-9.2.2.v20140723
> java -jar start.jar

2014-08-11 13:04:38.189:INFO::main: Logging initialized @12967ms
2014-08-11 13:04:43.278:INFO:oejs.Server:main: jetty-9.2.2.v20140723
2014-08-11 13:04:43.728:INFO:oejdp.ScanningAppProvider:main: Deployment monitor[file:/C:/jetty-distribution-9.2.2.v20140723/webapps/] at interval 1
2014-08-11 13:04:45.527:INFO:oejs.ServerConnector:main: Started ServerConnector@1abc23{HTTP/1.1}{0.0.0.0:8080}
2014-08-11 13:04:45.530:INFO:oejs.Server:main: Started @20861ms
----------------------------------------------------------------------------------


4. 서버가 실행되었다면 브라우저를 이용해 http://localhost:8080 페이지에 접속해보면 다음과 같이 404 에러가 발생된다.

Error 404 - Not Found.

No context on this server matched or handled this request.
Contexts known to this server are:

Powered by Jetty:// Java Web Server

이유는 인스턴스만 기동했지 아무런 컨텍스트 등의 리소스가 없기 때문이다.
톰캣과 같이 홈 루트에 ROOT라는 기본 컨텍스트 디렉토리에 intro 페이지를 기본으로 제공않기 때문이다.
컨택스트 정의는 "인스턴스홈\webapps\WEB-INF\jetty-web.xml" 파일에 합니다.


jetty는 별도의 데모 인스턴스를 기동해야 데모 페이지를 확인할 수 있다.


5. 데모인스턴스를 기동해본다.
> cd C:\jetty-distribution-9.2.2.v20140723\demo-base
> java -jar ../start.jar

2014-08-11 13:25:22.527:INFO::main: Logging initialized @1803ms
2014-08-11 13:25:23.181:WARN::main: demo test-realm is deployed. DO NOT USE IN PRODUCTION!
2014-08-11 13:25:23.185:INFO:oejs.Server:main: jetty-9.2.2.v20140723
2014-08-11 13:25:23.212:INFO:oejdp.ScanningAppProvider:main: Deployment monitor[file:/C:/jetty-distribution-9.2.2.v20140723/demo-base/webapps/] at interval 1
2014-08-11 13:25:24.342:WARN::main: async-rest webapp is deployed. DO NOT USE IN PRODUCTION!
2014-08-11 13:25:24.885:INFO:oejsh.ContextHandler:main: Started o.e.j.w.WebAppContext@21477c{/async-rest,[file:/C:/Users/ssm/AppData/Local/Temp/jetty-0.0.0.0-8080-async-rest.war-_async-rest-any-529785691001485515.dir/webapp/, jar:file:/C:/Users/ssm/AppData/Local/Temp/jetty-0.0.0.0-8080-async-rest.war-_async-rest-any-529785691001485515.dir/webapp/WEB-INF/lib/example-async-rest-jar-9.2.2.v20140723.jar!/META-INF/resources],AVAILABLE}{C:\jetty-distribution-9.2.2.v20140723\jetty-distribution-9.2.2.v20140723\demo-base\webapps\async-rest.war}2014-08-11 13:25:25.511:WARN::main: test webapp is deployed. DO NOT USE IN PRODUCTION!
2014-08-11 13:25:26.857:INFO:oejsh.ContextHandler:main: Started o.e.j.w.WebAppContext@1e91c40{/test,file:/C:/Users/ssm/AppData/Local/Temp/jetty-0.0.0.0-8080-test.war-_test-any-3900659022558313272.dir/webapp/,AVAILABLE}{C:\jetty-distribution-9.2.2.v20140723\jetty-distribution-9.2.2.v20140723\demo-base\webapps/test.war}
2014-08-11 13:25:27.373:INFO:oejsh.ContextHandler:main: Started o.e.j.w.WebAppContext@28842f{/proxy,file:/C:/Users/ssm/AppData/Local/Temp/jetty-0.0.0.0-8080-xref-proxy.war-_xref-proxy-any-1185034837788092682.dir/webapp/,AVAILABLE}{C:\jetty-distribution-9.2.2.v20140723\jetty-distribution-9.2.2.v20140723\demo-base\webapps\xref-proxy.war}
2014-08-11 13:25:27.589:WARN::main: test-jaas webapp is deployed. DO NOT USE INPRODUCTION!
2014-08-11 13:25:27.645:INFO:oejsh.ContextHandler:main: Started o.e.j.w.WebAppContext@399ad5{/test-jaas,file:/C:/Users/ssm/AppData/Local/Temp/jetty-0.0.0.0-8080-test-jaas.war-_test-jaas-any-6454231903457840622.dir/webapp/,AVAILABLE}{C:\jetty-distribution-9.2.2.v20140723\jetty-distribution-9.2.2.v20140723\demo-base\webapps/test-jaas.war}
2014-08-11 13:25:28.395:WARN::main: test-spec webapp is deployed. DO NOT USE INPRODUCTION!Calling TestListener.contextInitialized
2014-08-11 13:25:28.489:INFO:oejsh.ContextHandler:main: Started o.e.j.w.WebAppContext@56ebfb{/test-spec,[file:/C:/Users/ssm/AppData/Local/Temp/jetty-0.0.0.0-8080-test-spec.war-_test-spec-any-4997816671946262084.dir/webapp/, jar:file:/C:/Users/ssm/AppData/Local/Temp/jetty-0.0.0.0-8080-test-spec.war-_test-spec-any-4997816671946262084.dir/webapp/WEB-INF/lib/test-web-fragment-9.2.2.v20140723.jar!/META-INF/resources],AVAILABLE}{C:\jetty-distribution-9.2.2.v20140723\jetty-distribution-9.2.2.v20140723\demo-base\webapps/test-spec.war}
2014-08-11 13:25:28.592:INFO:oejsh.ContextHandler:main: Started o.e.j.w.WebAppContext@98e03e{/,file:/C:jetty-distribution-9.2.2.v20140723/demo-base/webapps/ROOT/,AVAILABLE}{C:\jetty-distribution-9.2.2.v20140723\jetty-distribution-9.2.2.v20140723\demo-base\webapps\ROOT}
2014-08-11 13:25:28.817:WARN::main: test-jndi webapp is deployed. DO NOT USE INPRODUCTION!
2014-08-11 13:25:28.933:INFO:oejsh.ContextHandler:main: Started o.e.j.w.WebAppContext@6e8f1{/test-jndi,file:/C:/Users/ssm/AppData/Local/Temp/jetty-0.0.0.0-8080-test-jndi.war-_test-jndi-any-4865082905996063980.dir/webapp/,AVAILABLE}{C:\jetty-distribution-9.2.2.v20140723\jetty-distribution-9.2.2.v20140723\demo-base\webapps/test-jndi.war}
2014-08-11 13:25:28.939:INFO:oejsh.ContextHandler:main: Started o.e.j.s.h.MovedContextHandler@d96047{/oldContextPath,null,AVAILABLE}
2014-08-11 13:25:28.946:INFO:oejs.ServerConnector:main: Started ServerConnector@1878e70{HTTP/1.1}{0.0.0.0:8080}
2014-08-11 13:25:29.009:INFO:oejs.ServerConnector:main: Started ServerConnector@1e633b7{SSL-http/1.1}{0.0.0.0:8443}
2014-08-11 13:25:29.011:INFO:oejs.Server:main: Started @8323ms


6. 데모 인스턴스가 정상적으로 기동되었으면 브라우저를 이용해 http://localhost:8080/ 페이지에 접속해본다.
다음과 같은 페이지를 확인할 수 있다
LIST
블로그 이미지

SeoHW

,
SMALL

폰스스톤 2월27일 링크

http://www.mediafire.com/download/k7fd2a9e457b9nd/hearth2.27.zip

http://www.mediafire.com/download/k7fd2a9e457b9nd/hearth2.27.zip


LIST

'하스스톤' 카테고리의 다른 글

JSTL 비교 표현식  (0) 2018.01.09
블로그 이미지

SeoHW

,
SMALL

Installing OpenJDK on a Raspberry Pi (Debian Wheezy or Rasbian Wheezy)

OpenJDK based on IcedTea is packaged for both soft and hardfloat systems. Installation of OpenJDK is easy:

sudo apt-get update

sudo apt-get install openjdk-7-jdk

LIST

'raspberry pi' 카테고리의 다른 글

CMD명령어로 Java JDK 설치하기  (0) 2015.02.12
블로그 이미지

SeoHW

,
SMALL

현재의 iptables 설정을 저장합니다.

$ sudo sh -c "iptables-save > /etc/iptables.rules"


network 설정 파일을 열어서 아래 스크립트를 추가합니다.

$ sudo vi /etc/network/interfaces


pre-up iptables-restore < /etc/iptables.rules


이제 부팅 중 network interface가 up 되기 전에 iptables 설정이 된다.


저장해둔 iptables rule을 적용시키려면

$ sudo sh -c "iptables-restore < /etc/iptables.rules"

LIST
블로그 이미지

SeoHW

,